The Portland Loo® Installation Instructions
The Portland Loo® installation video and instructions provide a comprehensive, step-by-step guide that takes you through the entire process, from the initial groundwork to the final installation of the restroom. In this detailed tutorial, we cover every phase of the installation, including site preparation, foundational work, and the proper assembly and placement of the Portland Loo structure. Whether you’re overseeing the project or actively involved in the installation, this course ensures that you have all the necessary information and instructions to successfully complete the installation, resulting in a fully operational and efficient restroom solution.
The Portland Loo® Installation Instructions
Supplied:
(1) Jig
(11) Titan anchors
Miscellaneous hand/power tools necessary:
Impact with ¾” socket
Two ¾” wrenches
Alignment pin
Crane rigging
Masonry drill with ½” Masonry bit minimum length
Drill with ½”, 9/16” and 5/8” bit
Rotary laser
Step ladder
Air Compressor & blow nozzle (or bottle brush)
Installation Procedure:
1. Layout stanchion template per drawing T-1.00 and bolt together using supplied 3/8” bolts
2. Locate template on footing pad using main sewer line as an indexing point.-NOTE
IMPORTANT- Square or parallel template to control joints in concrete
3. Place stanchions in rectangular notches in template(careful not to move template)
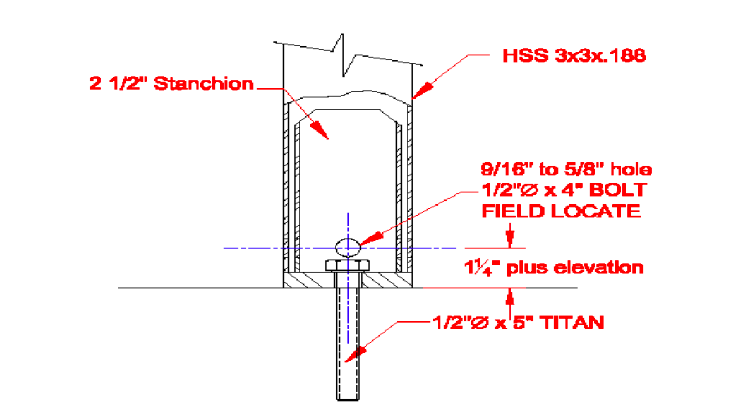
4. Drill ½” hole through each stanchion to required 5” depth in locations specified on
diagram T-1.00 *do not tighten anchors in stanchions*
5. Drill ½” hole in one of the front door stanchions
(1) Drive Titan anchor in 1”
(2) Move to electrical side of LOO and repeat the above
6. Using a laser level or long beam level, mark elevations at each stanchion point
7. Drilling 9/16” holes through stanchions.- foundation should be poured flat and level but
some adjustment for sloped foundation is possible with laser leveling and drilling bolt
holes in stanchions.
(1) High point elevation the hole will be drilled 1 ¼” ” up from the bottom of the
stanchion baseplate. Remainder will be 1 ¼” plus the elevation difference.
(2) Holes go through “ear” sides of stanchions
8. Install Stanchions PLUMB AND LEVEL in designated locations
(1) Use ¾” impact wrench to install Titan masonry anchors.
(2) Note direction of 9/16” thru bolt holes all run lengthwise with LOO
(3) Stanchions themselves must be installed as plumb as possible. Use washers if
necessary.
9. Make sure 4 ½” sewer line does not exceed more than 1” above the foundation and water
line is no more than 12” above foundation
10. Rig eye bolts on top of LOO to one central picking point.
(1) *Note* In the width of the LOO, optimum angle between slings/chains is 60
degrees.
(2) Make sure sewer line has boot before lowering the LOO
11. Pick Loo and set on stanchions as follows in order
(1) Align toilet carrier boot with main sewer line
(2) As columns slide onto stanchions, install bolts in holes as they align
(3) Once the majority of the bolts are in, it may be necessary to jack certain columns
to align holes. DO NOT LIFT AT LOUVERS THEY WILL BEND.
(4) The LOO must sit level for the front door to operate properly.
12. Tighten all bolts and sewer line boot
13. Hook up water main
14. Hook up main electrical
15. Adjust front door closer if necessary. Follow provided instructions.
16. Silicone seal between water closet chase and concrete. Use backing rod for large gaps.
Support is available by calling (503) 226-4990 or emailing [email protected]
Installation Instruction Q&A’s
What is the first step in installing The Portland Loo® restroom?
The first step is to properly prepare the installation site. This includes clearing the area, ensuring proper drainage, and confirming that the foundation is level and meets local codes. It’s important to plan the layout and make sure all necessary utilities, like water and electricity, are easily accessible.
Do I need any special tools to install The Portland Loo® restroom?
While you can use standard construction tools like wrenches, drills, and levels, there are some specialized tools that may make the job easier, such as lifting equipment for moving the restroom unit into place. It’s also recommended to have a team of installers to handle the weight and complexity of the setup.While you can use standard construction tools like wrenches, drills, and levels, there are some specialized tools that may make the job easier, such as lifting equipment for moving the restroom unit into place. It’s also recommended to have a team of installers to handle the weight and complexity of the setup.
Is professional help required for installing The Portland Loo® restroom?
Although installation can be completed by a skilled team with general construction knowledge, it is highly recommended to have professional guidance or oversight, especially if you’re unfamiliar with restroom system installations or local building codes. Hiring a contractor experienced in modular restroom units can ensure the job is done correctly.
How long does the installation of The Portland Loo® restroom take?
The installation typically takes 7-14 days, depending on site preparation and the complexity of utility hookups. The process is faster if the site is fully prepared and utilities are already in place. Additional time may be required for final inspections or adjustments after the unit is installed.
Are there any specific maintenance requirements after installing The Portland Loo® restroom?
Yes, regular maintenance is necessary to ensure the Portland Loo operates efficiently. This includes routine cleaning, checking plumbing connections, inspecting the doors and locks, and ensuring all fixtures are in good working condition. Following the manufacturer’s maintenance guidelines will help extend the lifespan of the unit and prevent costly repairs.